Microsoft Project and Calendar Views: Create a Custom Calendar

Have You Noticed the Calendar?
Still getting acquainted with Microsoft Project 2010? You’ve just got to meet the calendar! As
intuitive and remarkable as Microsoft Project is, remember that it’s just software: It cannot guide your scheduling of tasks or assigning of resources without a way to tell what day it is.
Your first two tasks whenever you start a project should be opening Microsoft Project, and calendar views should immediately be created before you even enter your first task. Here’s how:
Microsoft Project and Calendar Views
Open Project; go to New in the left-hand sidebar, and then, on the right-hand side, click on Create. Save this file as Project Calendar. Next, go to your Project tab, and in the Properties group look for Project Information. Click on it to enter your project parameters. This is how you should start each and every project.
To create a calendar that suits your company’s schedule, Project gives you three choices to use or build from. They are on the right-hand side of the dialogue box; there’s a drop-down box that lets you choose Standard, 24 Hours, or Night Shift.
- Standard fits the common Monday through Friday workweek, with hours of operation set from 8:00 a.m. to 5:00 p.m. and allowing an hour for lunch.
- Night Shift works if you are establishing a six-day workweek, from Monday through Saturday, working from 11:00 p.m. to 8:00 a.m., again with an hour for lunch.
- 24 Hours opens the schedule wide, 24/7/365. It means that your people are available to work nonstop throughout the week, month, or year.
The calendar created in this view is for a residential behavioral health facility. Since Residential indicates that the clients and staff are always there, we can learn how to set widespread scheduling options. The calendar chosen is the 24 Hours model. The same calendar would be useful for a factory running three shifts or for a law firm where the attorneys never sleep, for example.
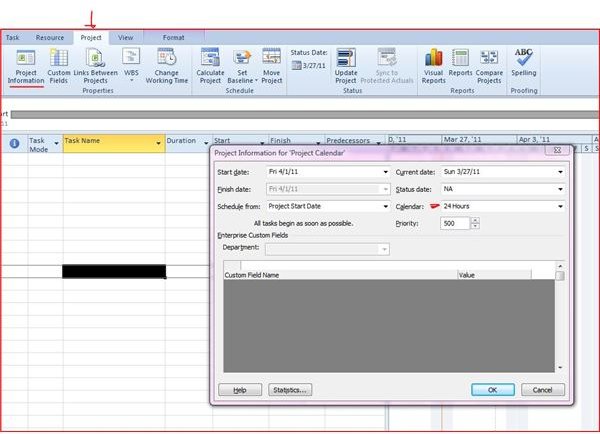
You can also set your Project Start or Project Finish date, but you cannot set both. Most people select Project Start to work forward from the starting day of your project. Choose Project Finish if you want to schedule your tasks backward from the finish date. The Priority setting defaults at 500. You’ll only change this if you have many projects, so Project knows which projects take priority when you are assigning tasks and resources.
Go back to File, and from the backstage view choose Options. In the dialogue box, choose Schedule, where you will input a lot of information about your company:
Calendar options for this project: The window will display the name of your project (Project Calendar).
Week starts on: You can choose Sunday, the first day of the week, or Monday, when most people start their workweek. You can choose the day that is the beginning of the pay period. For this project, because at this firm everything rolls with payroll, we are choosing Sunday, when all new pay periods begin.
Fiscal year starts in: Choose whatever month applies. For this company, the fiscal year begins in July.
Default start time: This is a 24-hour calendar; 12:00 a.m. (midnight) is entered.
Default end time: The drop-down window offers choices up to 11:30 p.m. You can type in your own time, which has been done here with an entry of 11:59 p.m.
Hours per day, Hours per week, and Days per month: Entered as 24 hours per day, 168 hours per week, and 31 days per month.
Schedule, Scheduling options, Scheduling alerts, and Calculation: You don’t need to change these from their default settings.
New tasks: Leave this at Manually Scheduled; you can always switch this to Auto Scheduling later. Click OK and move on.
Moving On to the Calendar in Project
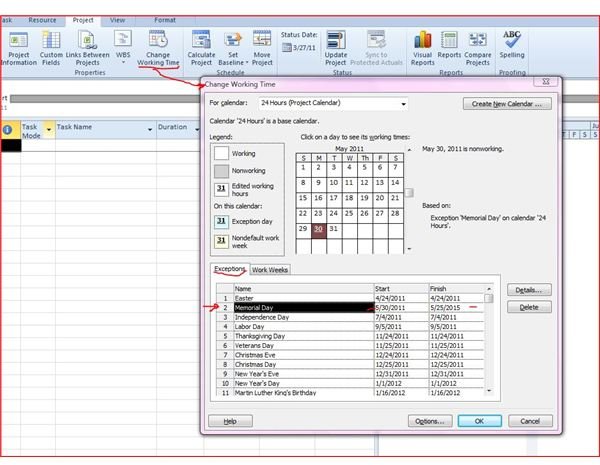
To coordinate your various files in Microsoft Project and calendar views, it’s important to set non-working days at your company and identify holidays. To do this, go to the Project tab and in the Properties group select Change Working Time.
In the calendar graphic, click on the day you want to notate. In Microsoft Project, this is called making an Exception. Click on the Monday for Memorial Day, and then you must click on the tab for Exceptions, before you can actually type the words Memorial Day. Then you can set the start and finish dates of your Exception. All holidays for the year are entered.
Please continue on page 2 for more on Microsoft Project and calendar views.
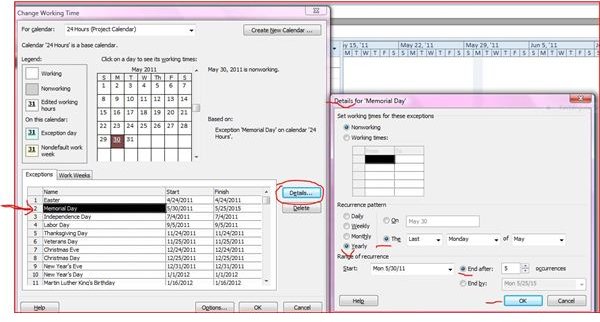
You can further define this Exception if you click on Details. This brings up a new dialogue box. The default setting is to show this day as nonworking hours for demonstration purposes only, since the employees at this facility actually work on holidays. I’ve also set this to recur yearly for five years. Repeat these steps:
- For your company holidays
- For days when you have quarterly or annual meetings or picnics
- For times when your plant or company is shut down—say, for hunting season, for the December holiday season, or for any time when your company grinds to a halt.
This screenshot shows Memorial Day listed as a day when there are no work hours.
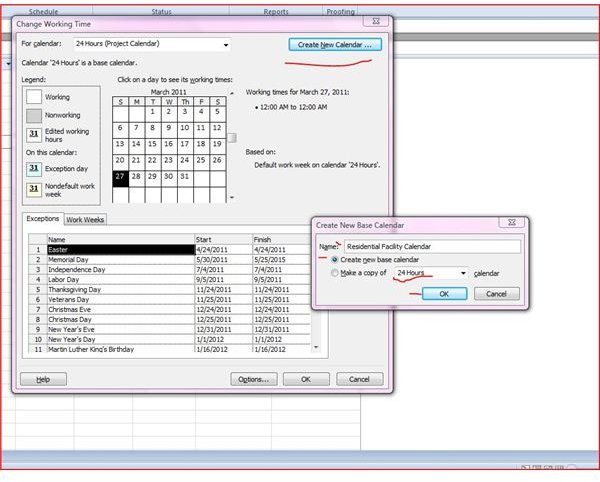
You can save your calendar and reuse it for other projects or share it with other supervisors. Go to the Project tab and choose Change Working Hours. Select, at the top right, Create New Calendar Button. This one is being named Residential Facility Schedule. We’ll do more with it in a minute, but let’s take a detour to resource and task calendars.
Resources and Tasks Have Calendars, Too!
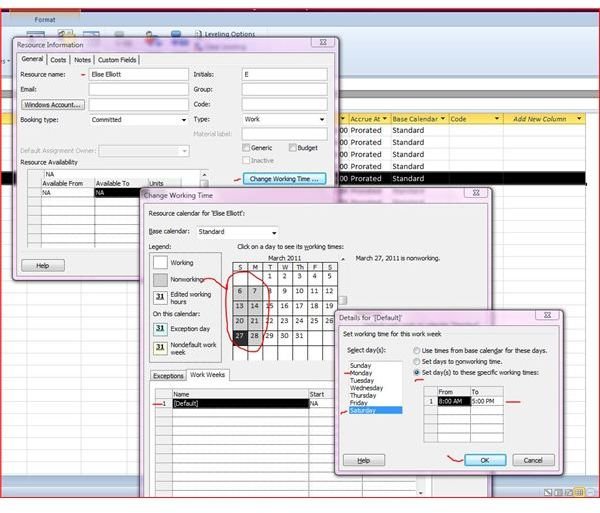
With any project, you can also set calendars for resources and tasks. Why is that useful? To demonstrate, we’ve opened up a separate file used to schedule staff training at the residential facility. The view below shows the Resource Sheet. Since the facility is open 24/7/365, the staff have various working days or shifts. We want to modify the calendar for Elise Elliott, who works daytime, Tuesdays through Saturdays. To do this, click on her name, and a Resource Information box opens. On the right-hand side, you’ll see the Change Working Time button. Here we can set her hours to work 8:00 a.m. to 5:00 p.m., Tuesday through Saturday
- Click on Elise’s name on the Resource Sheet to open the Resource Information box, and then choose the Change Working Time button.
- Go to the Work Weeks tab below the calendar. If Elise were to be off for just one Monday, this would be set on the Exceptions tab. But since she never works on Monday, the Work Weeks tab is chosen.
- Click on the word Default to open Details for Default.
- Select Monday and choose Set Days to Non-Working Time.
- We do not have to change Sunday, which was preset as Non-Working Time.
- For Saturdays, select Saturday and choose Set Days to These Specific Working Times and enter the regular working hours.
You can see on the graphic that Elise’s working schedule has been altered from the Standard to show that she only works Tuesdays through Saturdays. That means that if Elise is scheduled for training on her day off, her calendar will override the Project Calendar and alert the project manager that she does not work that day.
Tasks also have calendars. If, for example, you set a task that can only be accomplished in the daytime, Project will not allow you to schedule anyone to perform this task if they work in the evening.
Please continue on page 3 for more on Microsoft Project and Calendar Views
Customizing Microsoft Project and Calendar Views
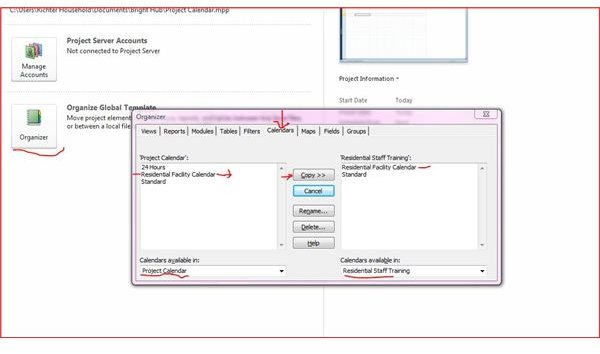
Go back to the Project Calendar that you created before; we saved a version called Residential Facility Schedule. Since you designated all company holidays, picnics, etc., why not apply it to the Residential Staff Training file? You can do this by implementing Project’s organizer tool:
- Both files must be open: Open the file called Project Calendar, because the Residential Facility Calendar is stored there. Also open the Residential Staff Training file.
- In Project Calendar, go to File, then Organizer, and when the dialogue box opens choose the Calendar tab.
- On the bottom left where you see Calendars Available In, choose Project Calendar.
- On the top left, you will see that the Project Calendar has three calendar options—Standard, 24 Hour, and the newly created Residential Facility Calendar.
- On the bottom right, where it says Calendars Available In, choose Residential Staff Training from the drop-down box. The only calendar available initially is the Standard calendar.
- When you click on the Residential Facility Calendar on the top left, and then the Copy button in the middle, the Residential Facility Calendar becomes available in the Residential Staff Training project.
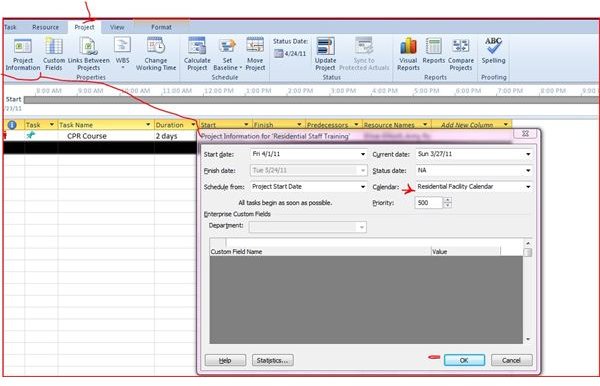
You can then close the Project Calendar file. Return to the Residential Staff Training file; go to the Project tab and then choose Project Information. The dialogue box reopens for this just as when you first created this file. But now you must go to the Calendar drop-down box on the right and choose Residential Facility Calendar, and then choose OK.
Now, with your calendar set, if you choose Auto Mode to schedule tasks and then you move a task to a nonworking day, you will be warned. Note that you will not be warned if you schedule tasks Manually.
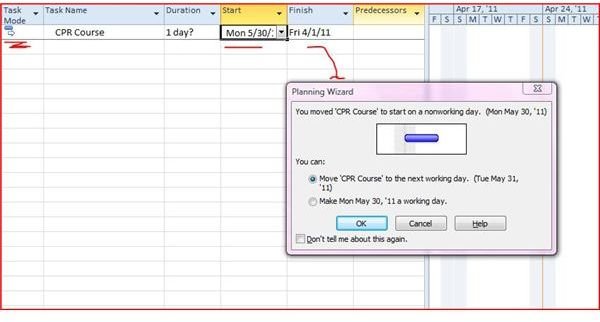
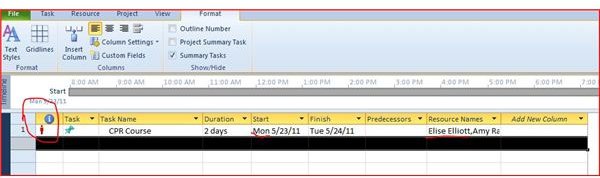
Likewise, if you schedule an employee for a task on a day when that employee is not scheduled to work, you will be warned. Let’s move the CPR course to a different Monday and schedule Elise Elliott to attend.
One of two things happens: If the task is set for a Monday while it’s still in Auto Mode, its date will automatically change as soon as Elise is added to the list of Resources attending this course. If you switch to Manually Schedule and enter it for the Monday, you will see a little red person icon to the left of the task line, alerting you that Elise is not available that day.
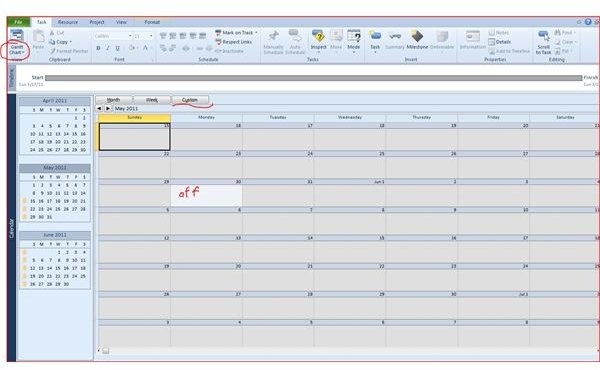
In learning about Microsoft Project and calendar views, you should also know that you can choose Calendar from the drop-down box at the top left. Project lets you look at a month or a week at a time; here the view is customized to show eight weeks at once, including the notorious Memorial Day holiday that we set as non-working.
Put the Calendar Out There
Once you’re finished and you are moving your calendar into another project file, you can go back to the Organizer in the backstage and choose Global MPT from the right-hand drop-down box for Calendars Available In. When you choose Global MPT, then any project manager or supervisor with networked access to Project can use your calendar.
Resources
Besides my own fledgling experience, I am grateful for:
Microsoft Project 2010 Support, at https://office.microsoft.com/en-us/project-help/set-working-times-vacations-and-holidays-for-your-project-HA010351554.aspx?CTT=1
Muir, Nancy. Microsoft Project 2010 for Dummies. Wiley Publishing, 2010, pp. 55-70.
Images
Wikimedia Commons, ZyMos (Microsoft logo)
All screenshots created by the writer.