Screenshot Examples of Microsoft Project Plans
Not Just Another Software
Microsoft Project lets you track activities and create reports that will showcase your work and crystallize your statistics. When you first begin using Project, you cannot imagine all the things you’ll learn: Each time you work on a basic project, you will stumble upon some new feature of Project that you didn’t even know about. Here you’ll see some examples of Microsoft Project plans that demonstrate how to consolidate aspects of Project for the best project plans possible.
Begin Your First Project…Just Jump In!
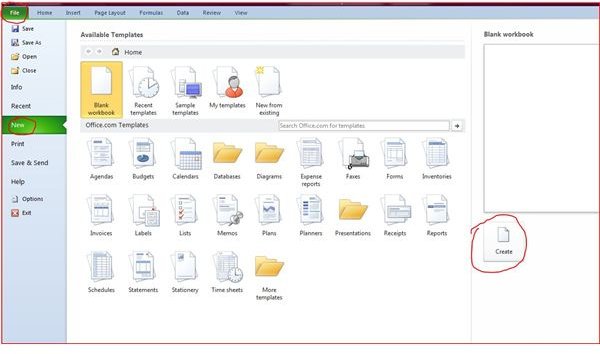
Your first experience with Project will be to open it up and become accustomed to the way it feels. To begin a new project, you select File and, in the Backstage view, choose New. Way over on the right-hand side you will see Create. Click that square, and a new Project file opens; save it and name it.
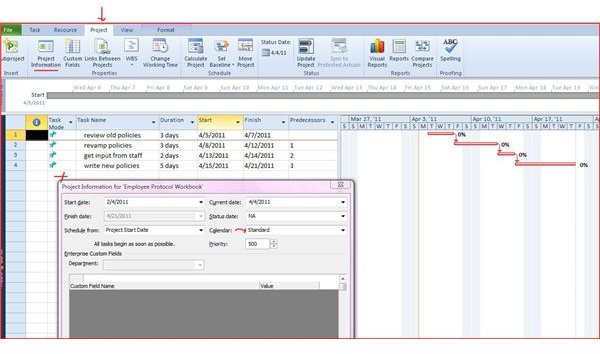
Among the tabs at the top, choose the Project tab. On the left hand side, in the Properties Group, you’ll see Project Information. Enter your Start Date; below that, where it says Schedule From, set it at Project Start Date. Project will not let you enter both a start date and an end date. Most people begin by choosing to enter a start date, and as you lay out your tasks, Project will pick up your last task as the ending date of the project.
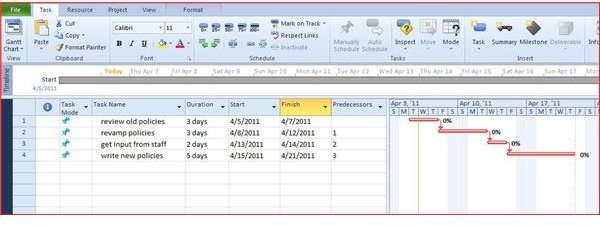
That just gets you started. You’re then free to enter a series of tasks and experiment with the formatting just to see what you can do. For example, although Project looks like Excel, you can’t tab through the columns. If you want to move a task up or down in the list, you have to select it, line the cursor up after the far left-hand column (1, 2, 3, etc.) until it’s a four-way arrow, and then slide your task up or down in the list. Once Project understands how long your project is, the bars for tasks will appear red, signifying the “critical path” that leads you to your finished project.
The Two Basic Project Files You Must Create
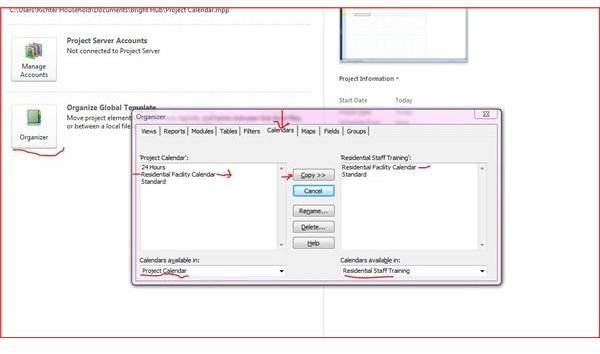
In order to make Project work for you, it’s a good idea to create two Project files that will become part of all your projects. They are the Calendar and the Resource files.
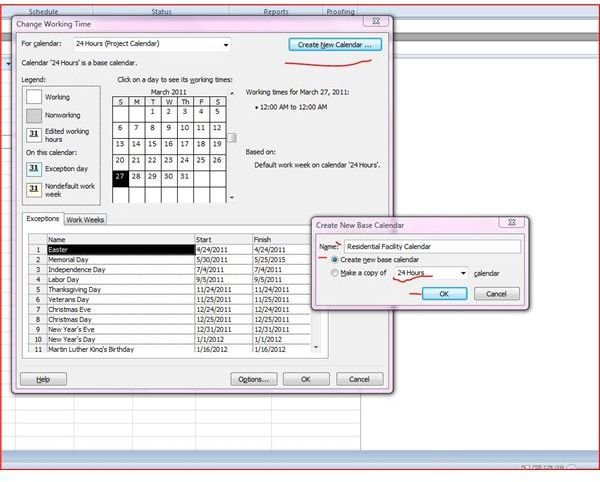
First, the Calendar: Do you really want to take the time to spell out your company schedule in each and every project you begin? Check out Microsoft Project Calendar View to learn all about the calendar feature. It allows you to set up a Project file with nothing in it except scheduling for your company. It will contain your general hours of operation, company holidays, quarterly meetings when all staff assemble, and anything else you can think of that pertains to a general schedule. Once it’s created, it’s available for each and every one of your projects.
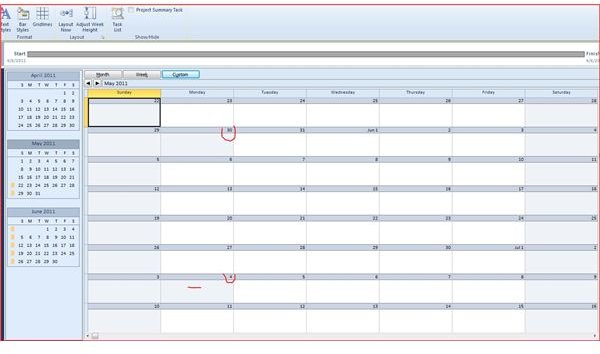
Below you can click on some calendar views in our examples of Microsoft Project plans. The one below shows an eight-week block of time with Memorial Day and Independence Day set as company holidays. Project will not let you schedule work on those days.
The second file you must create is the Resource file. In this file you list only the staff that you use regularly on projects. You can input each person’s working hours and how much they earn. When you bring this file into a new project, Project will keep track of how much time they have available and it will let you know if you’ve scheduled them when they’re not available.

Please continue on page 2 for more examples of Microsoft Project plans, with more about your shared resource file.
Shared Resource File (continued)
It can also help you track how much your staffing costs you on a project. Advantages of a Resource Pool in Microsoft Project tells how to set this up. The benefits include letting you know when someone is available for a project and also lists other projects they’ve worked on—in case you’re looking for someone with a specific skill set. As mentioned in the article about using resources in Project, it’s a good idea to create multiple resource files for different departments, because once you draw resource pools into a project, the resource file list will grow. Sometimes you supervise a project that requires your marketing people, and other times your maintenance people are remodeling an area. Why would you want to mix up those two groups of people?
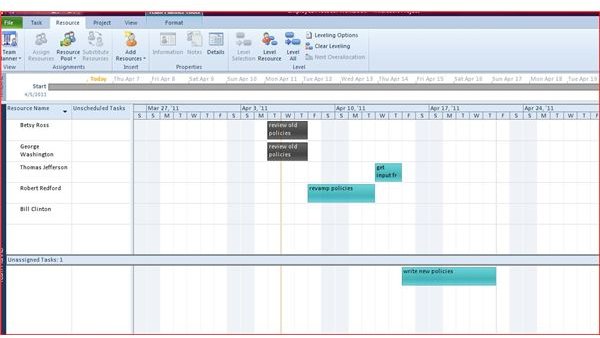
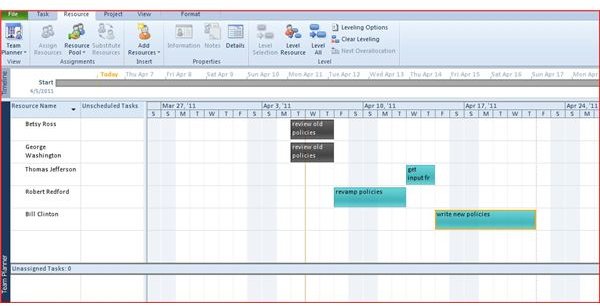
Below you can see a Project file called Employee Protocol Workbook. This Microsoft Project view is the Team Planner, which lets you figure out who is available to do what. Your employees’ names are listed along the left side. Tasks that are assigned to them are lined up accordingly. On the bottom portion you can see that the task Write New Policies has not been assigned. Since Bill Clinton is available, you can drag and drop that task into his row. Note that you can only drag and drop unassigned tasks.
Bringing Your Resource File into Your Project
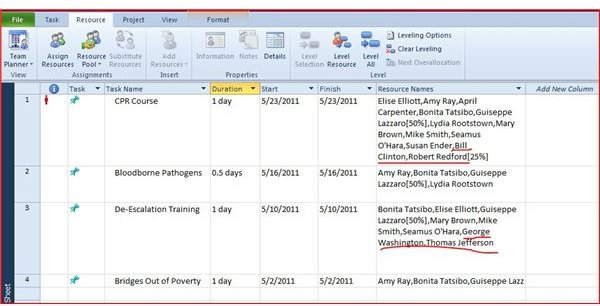
In this Task Sheet view for the Residential Training Project, I’ve signed up Bill Clinton and Robert Redford for CPR, and George Washington and Thomas Jefferson will take De-escalation Training.
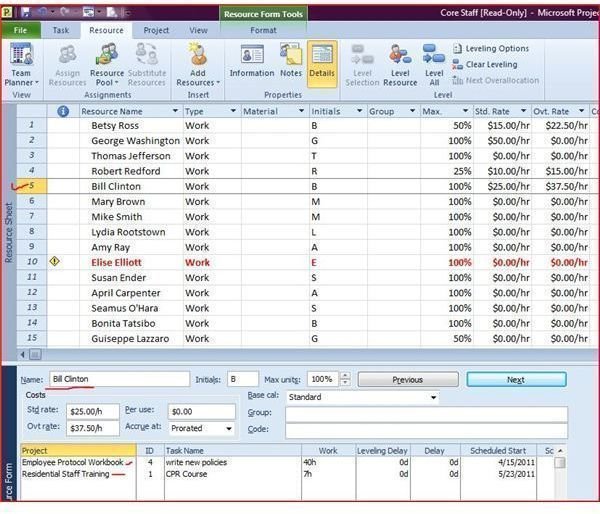
The view below is the Resource Sheet, and the Details icon in the Properties group has been selected. Now you can see all the projects each employee will be working on.
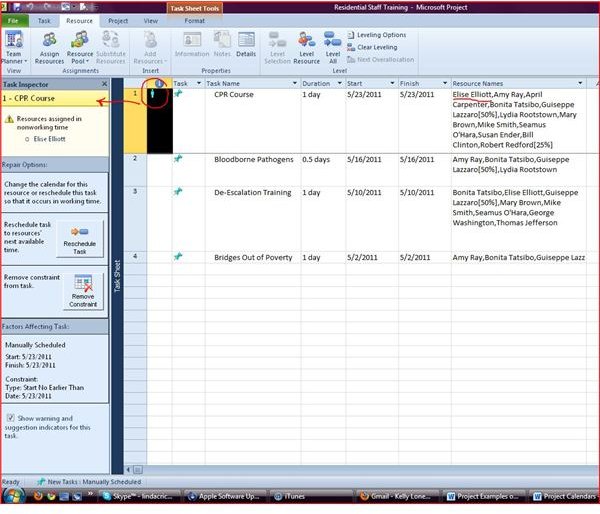
Whenever you schedule an employee for more work than his schedule permits, or for time when he is not scheduled to work, Project displays an icon to alert you. In this case, Elise Elliott cannot make it to the CPR course. Project’s Task Inspector suggests solutions, one of them being to reschedule the CPR course. In a case like this, you have to remember that Project is not a human being, and since you can’t move the entire course to fit one person’s schedule you will make your own decision to cancel Elise from the course. The Task Inspector also goes to work if Project sees a problem with the way you’ve scheduled your tasks.
Another interesting view of Project takes us back to our Maintenance Task list for the hospital accreditation site visit. In the Resource Sheet view, Budget Work and Budget Cost have been entered as resources.
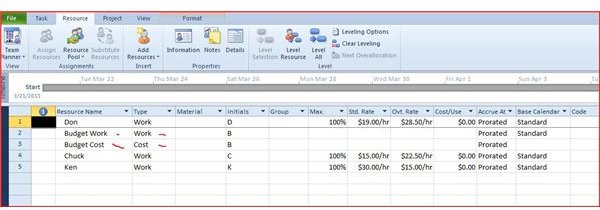
Now switch to a Task Sheet view, and go into the Backstage. Choose Options, and then Advanced. In the window that opens, scroll down to Display Options For This Project, and select Show Project Summary Task. Then, go back to your task sheet view; you will see the Summary Task listed as Line 0 of your project. Add Budget Work and Budget Cost as the Resources for this line. Add a column for Budget Work and then type in a number of hours—400 was chosen for the example below. Add a column for Budget Cost and then type in your budgeted amount—say, $7,000.
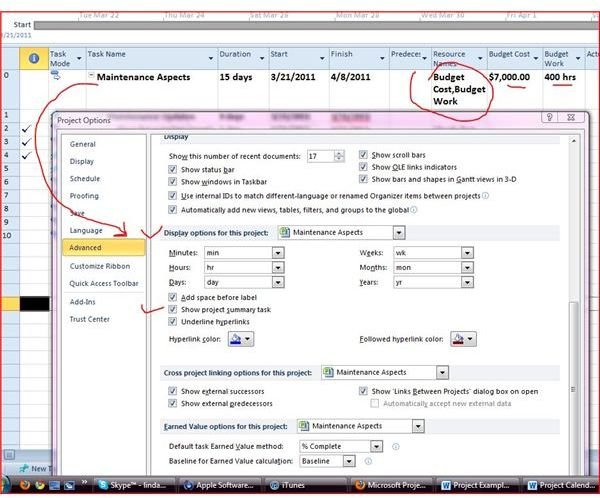
Note that whenever you’re adding a column, you get a drop-down window with about a zillion column headings. Look carefully for the ones specified here. As your project evolves, Project will track its hours and costs.
There’s so much that Project has to offer. Hopefully these examples of Microsoft Project plans have given you some ideas for putting Project to work. Remember that no matter what view you go to, you are never altering your data; you’re just looking at it in a new way. Even if you hide a column (which works a little differently than with Excel) or change your baseline view, your data is never gone. Any comments, questions, or suggestions can be submitted below—I’d love to hear what you love and hate about Project.
Screenshots created by the auhtor.
All information in this article is from the writer’s experience with this software.
Recommended Reading:
Muir, Nancy. Project 2010 for Dummies. Wiley Publishing, 2010.