Review of PowerCard 3.1 - Mac Project Management Software That Mimics Manual Filing
What is PowerCard 3.1?
PowerCard 3.1 is an inuitive task card based interface that allows users create index cards to represent accomplished tasks. Users can also manipulate the cards to organize them by priorities and milestones. PowerCard is the first Mac application that uses this type of organizational methodology. It is also the first ever “Rendezvous Enabled” project management application in that it allows multiple users to edit projects simultaneously.
Project managers can view projects in PowerCard either as index cards, in a list, or in free form view. PowerCard features include:
- Generate reports
- Track accuracy of estimates
- Address Book integration
- Gantt charts
- PERT charts
- Burndown charts
- Velocity calculation
In the previous version of PowerCard, there were some bugs that made the program difficult to use. These bugs have been address with the release of version 3.1 and include:
- Help file page
- Double clicking cards in the PERT chart view chose the wrong card.
- Linking a card with itself caused the application to crash.
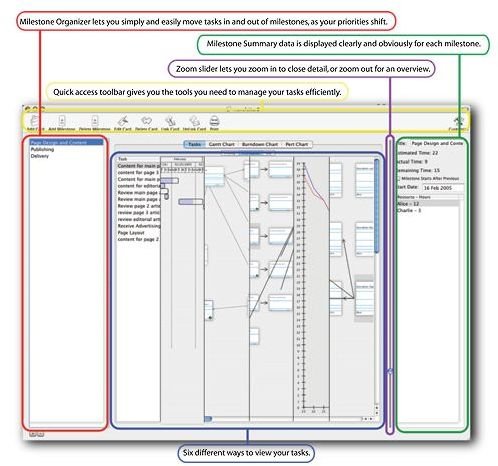
PowerCard Screenshot
Usability of PowerCard (5 out of 5)
There are five main steps that are suggested to follow to get started using PowerCard 3.1. I followed each step to see just how easy it was to use the program.
- Step 1 - Enter and prioritize tasks**:** Work with your team using the “Priority” task view and enter tasks. Drag more important tasks to the top of the lists. Here, you only lists tasks.
- Step 2 - Link related tasks: Look back at the tasks entered in step 1 and ask if there are any tasks entered that require the completion of addition of another task. You can click and drag a task card onto a related card to connect the two and PowerCard handles scheduling the tasks so that they are prioritized properly.
- Step 3 - Assign resources: Under the “Pert Chart” view, you can double click on a card to assign resources. Here you can view tasks that require other tasks and those that can be performed in parallel, depending on how they are laid out. You can see your critical path and places where you can become more efficient by assigning parallel resources.
- Step 4 - Enter estimates: Under the tasks tab, choose “Task List”. Here you sort your assignments and have each resource turn in an estimated time it will take to complete the task.
- Step 5 - Work your schedule: When you click on the Gantt chart tab, your schedule is laid out. Each week of the project, you can return to each team member and update the status of their assigned tasks. PowerCard tracks the schedule progress. The BurnDown chart shows how much time is left in the project and whether the estimates you made in step 4 are accurate.
These five steps were easy to apply and manipulate. The visual interface make projects easy to manage and organize. It is a fairly simple tool, but it is intuitive and easy to follow. Everything is straightforward and easy to manipulate. One downfall may be that is is a Mac only program. Here you can download a free 30-day trial to see if it fits your needs. The full version call be purchased for $29.95. making it a fairly inexpensive tool.