Microsoft Project, Lesson 3: How to Use Menus and Toolbars
Introduction
Our first idea behind taking this subject up in Lesson 3 of this tutorial on Microsoft Project, rather than starting the tutorial with this, involved getting you started with a simple example focusing on the outputs and getting a working project plan up in the shortest possible time. The second idea, as you must have realized, was that without spending much time on learning this subject in a structured way, you already have a reasonable picture of how to move around in Microsoft Project.
This is very characteristic of most software developed by Microsoft. You learn the fundamentals more or less intuitively, and the look, feel and user experience are pretty standardized across different applications such as Microsoft Excel, Microsoft Word, PowerPoint, and so forth.
You can read the first two tutorials in this series in Lesson One, Getting Started in Twenty Minutes, and Lesson Two, Task Insertions and Groupings.
Screen Layout and Menubar
Let us start with the Screen layout and the Menubar.
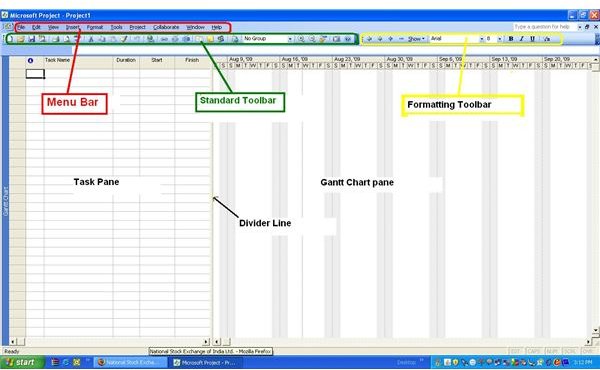
Start Microsoft Project, as you have done in the previous lessons. Before you open any file, the screen should appear as shown here. The opening screen is divided into two panes - the task pane on the left and the Gantt chart pane on the right with a divider line between the two panes. The topmost line below the application title is known as the Menu Bar. As you see, this bar contains menus for various actions under File, Edit, View, Insert, Format, Tools, Project, Collaborate, Window, and Help. If you are using Microsoft Project 2007, you will see an additional menu for Report. (Click any image for a larger view.)
Just below the Menu bar you will see two toolbars - the Standard toolbar and the Formatting toolbar. These are the default opening components when you start Microsoft Project. As we mentioned earlier, depending on the settings in your version, you may also see a Guide pane to the left of the task pane. In case you do see such a pane, please close that pane for now, as you had done in Lesson 1.
You have already worked with the task pane and the Gantt chart pane. The divider line can be moved to the left or right depending on how you want to divide the visible portion of your screen between the two panes.
- Move your mouse pointer over the divide line until you see a double-headed arrow.
- Click the left mouse button and drag the divider line to the left or right.
To understand the menus in the menu bar, click on each heading and a dropdown list will display the options under each of them. You have already used the File menu for saving your file. The other options are similar to what you must have seen in other Microsoft Office applications. Try looking at the dropdown list under each menu to get a feel for the contents. Most options perform the functions that you would intuitively expect them to.
Toolbars and Icons
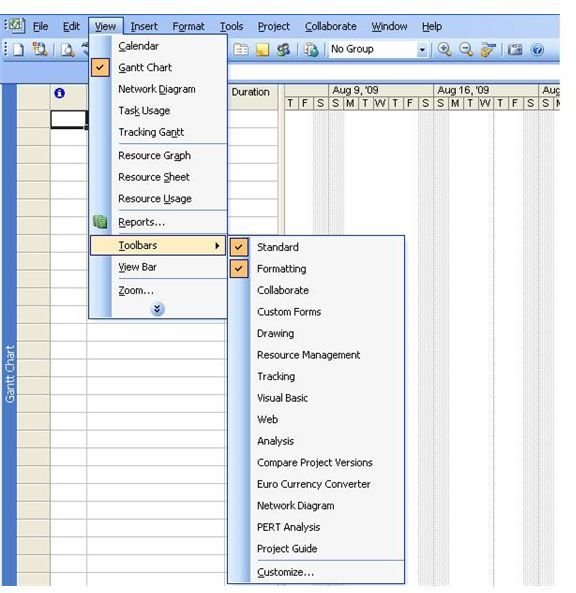
The option for toolbars appears under the View menu. As you can see in the View menu, the Gantt chart has a check mark to its left. This means you are currently using the Gantt chart view. At this point, open your Concert Project and the try clicking on other various options under View menu – like Calendar, Network Diagram, Task usage, Tracking Gantt, etc. – and you will get an idea of the
outputs of each of these views. As we progress with more features of MS Project in future lessons, these views will gain relevance and you will understand them more clearly.
The View menu also has the option “Toolbar” with a pointer to the right indicating this option has further sub-options. When you move the mouse over the Toolbar option you can see the toolbar sub-options list popping up as shown here. Again, as you can see, the Standard and Formatting toolbar options are checked in this list by default.
Move to the sub-option area and uncheck the Formatting toolbar. See what happened to the Formatting toolbar? It’s not visible now. Check the Formatting option back again and make it visible. Similarly click on other options in the toolbar sub-options list and see the effects on your screen.
Before we move on to understanding the contents of the toolbars, on the View menu, below the Toolbar option, you can see an option called “View Bar.” Click on that and see for yourself what happens. Like what you see? Yes, this is a graphic navigational tool for the View menu.
We will learn more about the toolbar icons and cover some additional tips and tricks in Lesson 4 of this series, and be sure to also take a look at the other Microsoft Project tutorials available on Bright Hub PM.
This post is part of the series: Step By Step Tutorials on Microsoft Project
This series of articles take you through the steps involved in building a complete project using Microsoft Project software. The series starts with a very simple project spanning just ten tasks, and the builds on the simple project by introducing new elements. A hands-on approach is used throughout
- Step-By-Step Tutorial on Microsoft Project: Getting Started in Twenty Minutes
- Task Insertions, Amendments and Other Features in Microsoft Project (Lesson 2)
- Getting to Know the Menus and Toolbars in Microsoft Project (Lesson 3)
- Toolbars Continued, Plus Tips and Tricks in Microsoft Project (Lesson 4)
- Types of Task Relationships in Microsoft Project (Lesson 5)