How to Manage Resources in Microsoft Project: Step By Step Tutorial on Resource Management
Warming Up
Once a project has been broken down into manageable tasks and the dependencies between the tasks have been defined, it is very easy to enter the details in Microsoft Project. The Gantt Chart and the Network Diagram created by Microsoft Project at this stage give substantial insights into the time dimension of your project plan, indicating the minimum total duration through the critical path, the slack available for activities which are not on the critical path, group-wise task schedules, and so forth.
In case you are totally new to Microsoft Project, we have some interesting tutorial lessons available at Bright Hub. For a quick refresher, see these articles on how to start a project using Microsoft Project, and how to define dependencies between tasks in a project.
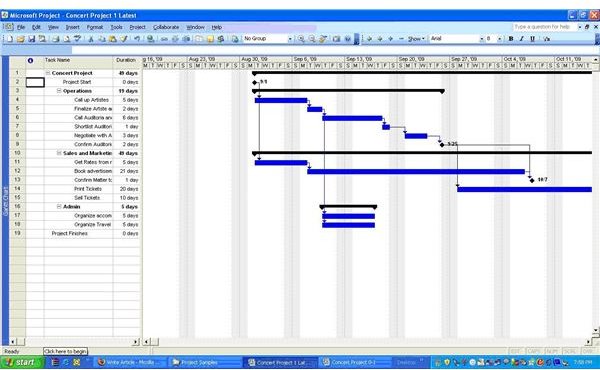
We will start with a project involving the activities to be carried out by an Event Management firm in organizing a concert. Initially the project is broken down into a set of high-level activities as given here.
(Note: To see a larger view of any image in this article, please click on the image.)
Please enter the activities shown with their duration and dependencies, and save the file as “Concert Project.”
The question then is “who” and “what” are required to implement this project plan. The answer to this lies in the resources.
Define Resources
Let us now indicate to Microsoft Project, “who” all is available in the firm to perform the activities defined in our Concert Project. We will include the following resources in Microsoft Project as entities available:
- Operations/Admin Assistants
- Operations/Admin Executive
- Sales Assistants
- Sales Executive
- Project Manager
As you will realize, these are the “human” resources available in the firm for implementing the project. To indicate “what” is available, let us include:
- Desktops
- Laptops
These are the equipment resources available. (Microsoft Project treats equipments and materials similarly and hence, these may also be referred to as material resources.)
Besides naming the resources, you will realize intuitively that we need to indicate two more important pieces of information to Microsoft Project:
- How many of each of the above resources is available for assignment to the project?
- Are there periods when some of the resources are unavailable, due to planned leave, or commitment to other projects?
Define Resources
In our case, we will assume, we have:
- 3 Opns/Admin Assistants (One is on leave from 16 Sep to 30 Sep)
- 2 Sales Assistants (Both on leave from 28 Sep till 9 Oct)
- 1 Opns Executive, 1 Sales Executive and 1 Project Manager available throughout the project
How do we indicate all this to Microsoft Project?
Entering Resources in Microsoft Project
The steps to enter the resources in Microsoft Project for our Concert Project are as follows:
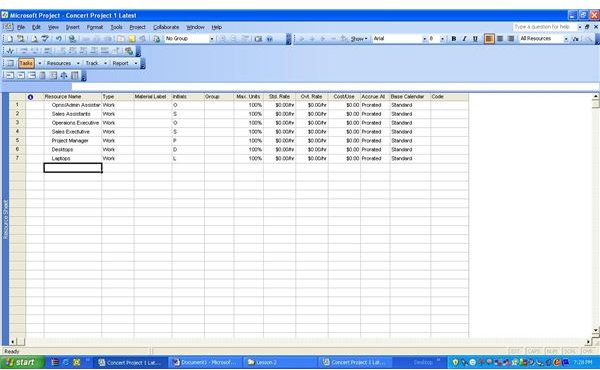
- Open the Resource Sheet under the View menu (View->Resource Sheet).
- Under Resource name column, enter the above 7 resources, one in each row. Do not fill in any other column right now. With the default values in other columns, the resource sheet should appear as given in this image.
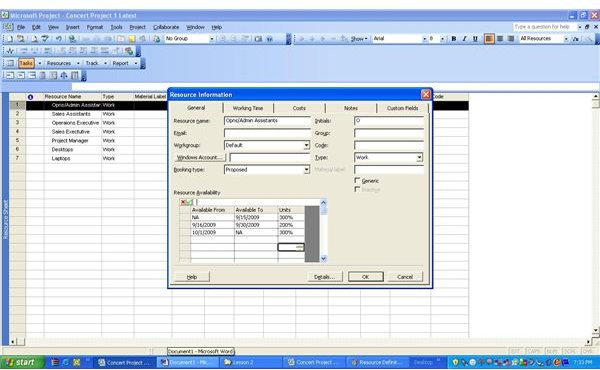
- Double-click the first resource (Opns/Admin Assistants) to open the Resource Information window. In the General Tab, the resource name appears based on the row you double-clicked.
- You may leave the default initials assumed by Microsoft Project.
- The list box against the field for Type of resource has two options: “Work” or “Material”. As indicated in the earlier section choose “Work” for human resources and “Material” for desktops and laptops.
- Change the Booking Type to “Proposed”.
- In the Resource Availability table enter the availability data for Opns/Admin Assistants in the first three rows under the columns Available From, Available To and Units, based on what we mentioned in the previous section:
- In the first row enter: NA, 9/15/2009, 300%.
- In the second row enter: 9/16/2009. 9/30/2009, 200%.
- In the third row enter: 10/1/2009, NA, 300%.
The above means that we have 3 Opns/Admin Assistants at our disposal (indicated as 300%) under Units. While all three are available till 15 Sep, one of them is slated to be on leave from 16 Sep till 30 Sep and hence the units for this period are 200%. After 1 Oct, all three are available again. (NA indicates from beginning or until end.)
- Press OK
- Repeat the above steps by double clicking other resources and fill out the Availabilities as indicated in the previous section.
- For Desktops and Laptops change the resource type to Material.
Conclusion
Congratulations!!! You have now defined all of your human resources and material/equipment resources, and you have also indicated to Microsoft Project how many units of these resources are available for this project, including information on the periods during the project duration when some of the resources are not available.
The next step in Resource Management is to assign these resources to various tasks and check the resource loading. Overload situations may call for some techniques for rescheduling so that we get an evened out utilization of resources. Do check back for our tutorial on resource assignments, resource leveling and other advanced topics in the next few days.