How To Transfer Excel Data to Microsoft Project
Many project plans often start as spreadsheets assembled in Microsoft Excel. Suddenly, the project is too large for the spreadsheet and requires the project manager to move the data into a more diverse and flexible format, namely a Microsoft Project plan. The initial thought may be that the data from the Excel spreadsheet will need to be re-entered into the project plan, however, thanks to the integrated nature of the Microsoft products, adding data from your spreadsheet into your project plan is a snap.
To move your Excel data into Microsoft Project as a new plan, follow these steps:
- From the File menu in Microsoft Project, select Open
- Locate your Excel spreadsheet in the folder you have it saved. Be sure to select Microsoft Excel workbook (*.xls) from the “Files of Type” drop-down menu in the Open menu
- Highlight the file and hit the Open button
- As soon as you select Open, the Import Wizard will open with detail that it is going to walk you through how to add the Excel spreadsheet to your project the way you want it. Select Next.
- In the next window, keep “New Map” selected if you have never used the Import Wizard before.
- To start a new project with your Excel data, make sure the button “As a New Project” is selected before you click next. You also have the option to add the data or merge it with an existing project plan. Click Next.
- The next window of the wizard will ask you how you want the data to be entered into the project: as Tasks, Assignments, or Resources. You may select one or all three of the options depending on how robust your spreadsheet is. Click the best options for you and hit Next.
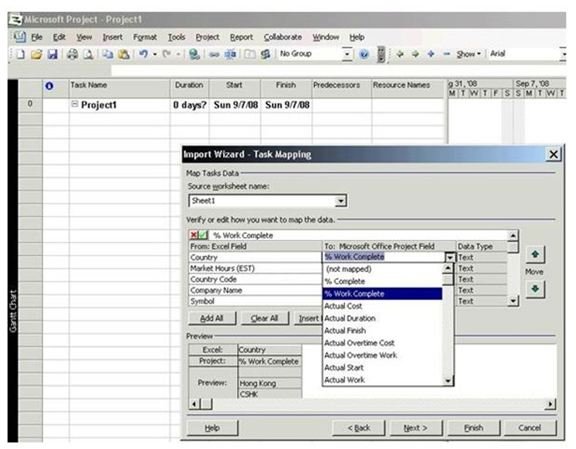
- The next window will help you sort your Excel spreadsheet columns by their corresponding function in Project. If you selected “Tasks” in step 7, it will begin by helping you to organize your column data by the appropriate task properties. a) Select the sheet number from the workbook at the top of the wizard and notice all your current column headers will populate in the left column of the mapping chart, “Excel Data.” b) Look to the right of each row and see there is a corresponding field for the MS Project equivalent. This should be a drop-down menu and offer a selection of fields for you to rename/recalculate the column with. Select one. c) You may go down the list of your Excel column names and convert their functions to Project-appropriate names until the Task columns are assigned.
- When they are all assigned to your liking, select Next.
- If you selected more than one option in step 7, you will repeat the process for any columns you have that qualify as “Resources” or “Assignments”
The final window will appear in the Import Wizard and will notify you that it has all the information needed to complete you data transfer. Select “Finish” and your project should appear as you wanted it, with all the data populating from your Excel worksheet accurately!