With Project, Microsoft provides a powerful resource capable of managing even the most complex projects. Here you will see an example of a budget and how to create it.
Getting Started
To get ready to see how to create an example of a budget in Microsoft Project, you must first have Microsoft Project installed on your computer. This Microsoft Project Tutorial uses Microsoft Project 2007 installed on Windows 7. If you have a different version or a customized program , you still should be able to follow along.
Creating a Project and Adding Budget Items
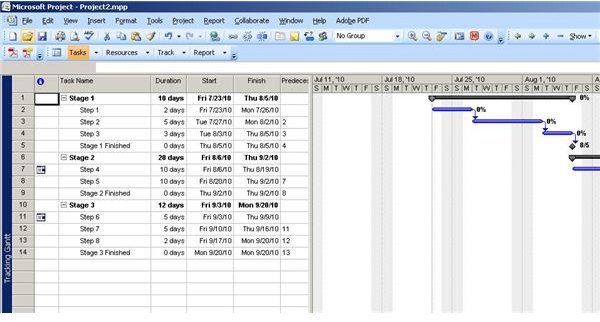
The first step is to create a sample project, typically done during the planning phase, to be used as a demonstration. In this example of a budget in Microsoft Project, we have a simple three stage project as seen below.
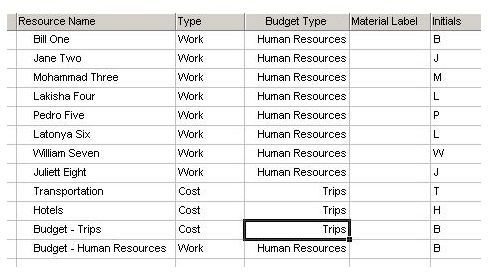
Next, view the project resource sheet by clicking on “View” and then “Resource Sheet.” As you can see, we have added 8 work resources and 2 cost resources to get started.

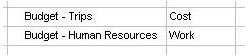
Now, add two budget items: “Budget - Trips” as “Cost” and “Budget - Human Resources” as “Work.”
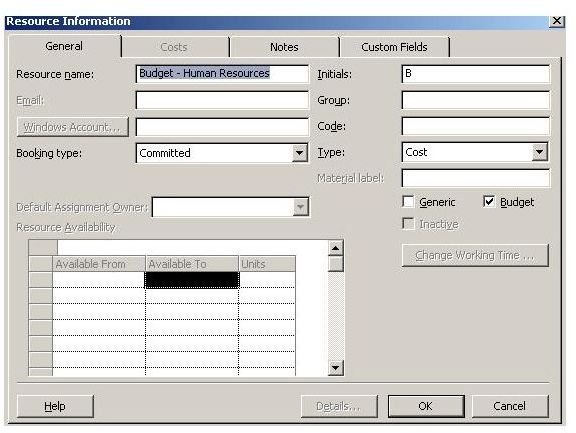
After entering each item, open the “Resource Information” dialog for each. Choose the “Resource Type” as cost and then click the “Budget” check box. Click the “OK” button when done.
The next step in this example of a budget in Microsoft Project assigns the budget items to the “Project Summary.”
The Project Summary
The next part of this example of a budget in Microsoft Project requires you to switch to the “Gantt Chart” view . Once there, click on “Tools” on the main menu and then select “Options.” If the “View” tab is not displayed, select it by clicking on the tab with your mouse.
Check the “Show project summary task” box and then click the “OK” button.

You now see the example of a budget in Microsoft Project added as the top row.
Select that project summary task and then click the “Assign Resources” button on the toolbar.

Next, select the two budget resources created earlier in this tutorial and then click the “Assign” button.
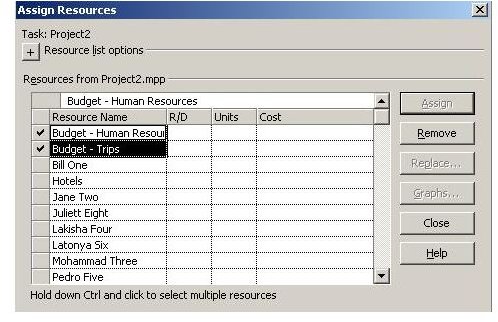
When that is done, click the “Close” button. The budget resources are now assigned to the project. Now it is time to create values for each one. To do this, click “View” and then “Resource Usage.” In this view, the next step is to add budget cost and budget work fields. Click “Insert” on the main menu and then “Column.” In the “Column Definition” drop down box, select the “Budget Cost” field.
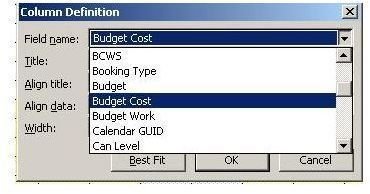
Click OK and then repeat to add the “Budget Work” field. Now you can add budgeted amounts for the “Trips” and “Human Resources” costs.

Now, you have to choose which resources to track and measure with regards to the budget. We will now create a custom field to accomplish this.
Adding the Budget Type and Viewing Budgetary Performance
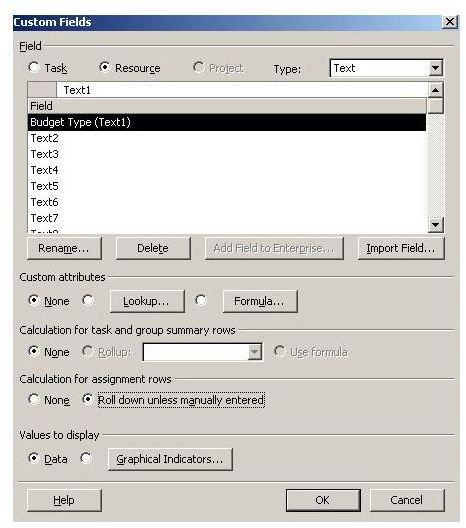
As we continue this example of a budget in Microsoft Project, switch back to the “Resource Sheet” view and then click the “Tools” menu and then select “Customize” and then “Fields.” Choose a text field and call it “Budget Type.” In the “Calculation for assignment rows” section, choose “Roll down unless manually entered” option and then click the “OK” button.
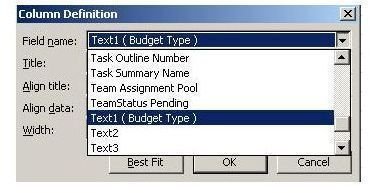
Add the new field to your resource sheet by highlighting the “Material Label” column, clicking the “Insert” option on the main menu, and selecting column. Find the custom field you just created in the drop down list and then click the “OK” button.
You will now see the “Budget” column appear at the top of your resource sheet. You can define each resource as either a Trips or Human Resources budget item.
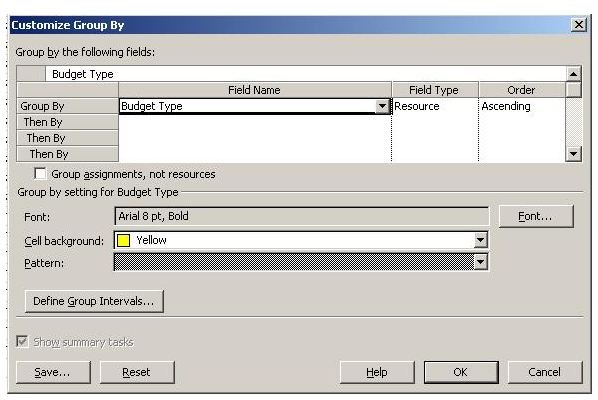
The last step is to group the resources of the project based on the “Budget Type” field. This allows us to compare the project’s budget to the resources assigned to the project. To do this, change to the “Resources View.” Click the “Project” option on the main menu and then “Group by.” You want to select the “Customize Group By” option.
In the “Customize Group By” window, select the custom “Budget Type” field from the drop down box on the “Group By” row. Click the “OK” button.
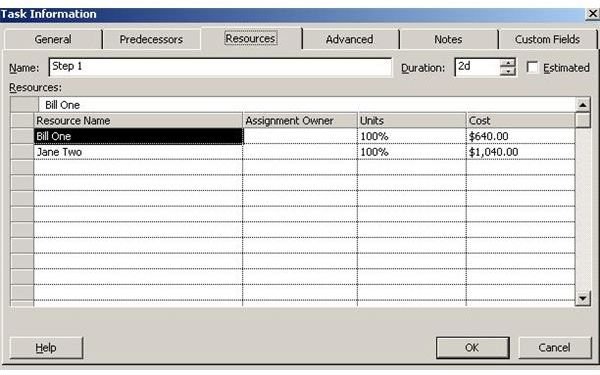
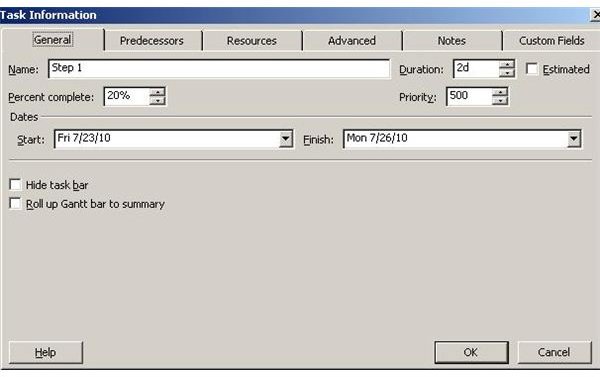
Now, go back to the Gantt Chart view and assign resources to each task and assign a progression to each one. This is necessary to see how the budget tracking works.
Now this example of a budget in Microsoft Project is complete. Click “View” and then “Resource Usage” to see the resources sheet. Here you can compare the budgeted amount for each budget type with the actual usage for each resource.
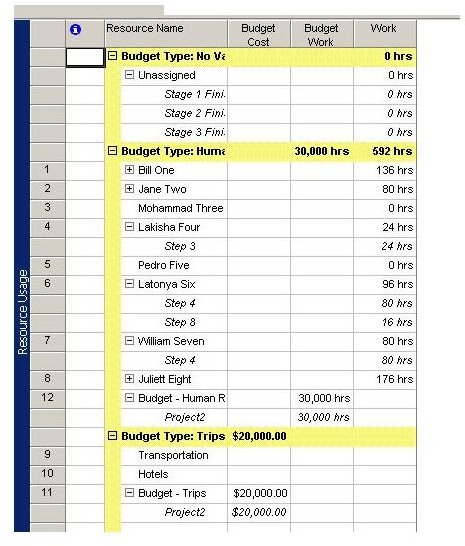
As resources do work and take trips, you can easily track and print out a report of how your project is performing based on budgetary considerations.
This Microsoft Project tutorial showed you an example of a budget in Microsoft Project. Because this was a tutorial, your actual project will be different, but will apply the same principles used here.
Image Credits: Screenshots taken by Bruce Tyson