
When you begin to outline a project using MS Project, should you create a resource pool? And how is it done? Using the Microsoft Project 2010 resource pool is the best way to build up a compendium of information that you can use over and over.
Keeping Track of Your Resources
Before Microsoft Project came along, you started a new project by typing a list of tasks and considering which people in your company would be good at getting them done. When the next project reached your desk, you worked the same way—figuring out what needed to be done,
and then deciding who would do it.
Microsoft Project 2010 is all about making your life easier. You shouldn’t be surprised to learn that it allows you to list your resources once—and be done with it!—and then put that list to work for you each and every time you start a project.
When you create a list of resources and keep it on a company drive or server that you and other project managers can access, that list is called a resource pool. What are the advantages of a resource pool in Microsoft Project?
First, it lets you create a list —one time only, like I said above—that you can use over and over. You can enter information about each person on your resource list that you will find handy as you go along. Consider these examples:
- Your list will let you identify whether people work full time or part time.
- If your favorite graphic artist only works Monday through Thursday, and you schedule tasks for her on Friday, Project will wave a red flag at you.
- When budgetary considerations dictate bringing a project home under budget, Project lets you look at people’s pay rates; you might want to bypass someone who pulls in big bucks and settle for someone who will cost you less.
- What if you have a maintenance crew that several project managers must utilize? There’s a feature that lets you see just how many different projects a given resource is working on. You can also see the dates of assignments. If you forget to check a date before you schedule Handyman Joe, Project will tap you on the shoulder.
Two Pools Are Better Than One
I recommend creating multiple resource lists. I had difficulty when I created one large Project 2010 resource pool. You’ll find it’s cumbersome to limit who you bring into a project from one large resource pool. If you bring in part of the list, you bring in the whole list. In some projects, I wanted Maintenance but not the Marketing people. Other times I needed Copyeditors and Graphic Artists.
You are probably thinking that Project lets you specify a generic term for a resource such as “typists” or “copyeditors.” But you are working beyond that now. You are going to initiate and maintain several resource pools, and each time you or your managers begin a new project, they can pull in people from multiple resource pools and customize total resources for a project.
Another problem with one large resource pool is the number of people who won’t be assigned tasks—the ones you just don’t want to use this time around. They can simply rest idly on the computer screen, right? Well, no. Their presence will impact some of staffing reports you can create on Project. And if you use the leveling feature—which allows you to distribute tasks evenly so that nobody has too much to do—the people you want to ignore will end up with tasks that must be reassigned.
First, Identify Your Resources
Now you will learn how to create a resource pool using Project 2010. Although this software allows you to identify three types of resources—work, material, and cost—we are going to deal with the human, or work, resources.
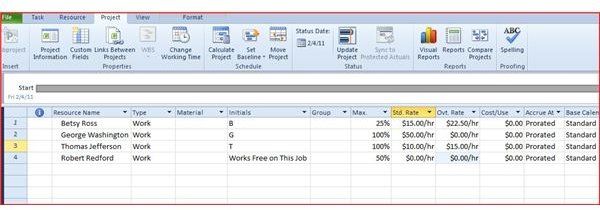
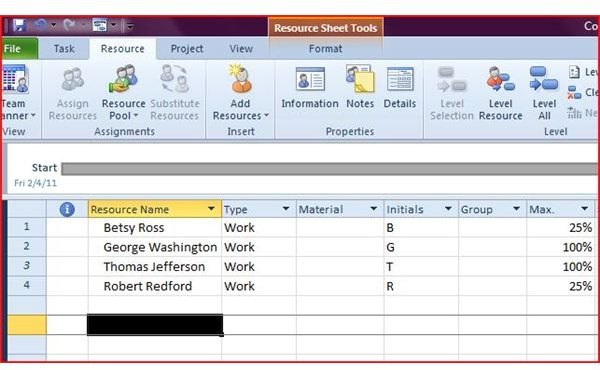
Close whatever project you are working on, and open a new project. Save it as Core Resources. It will be only a file of resources with no tasks assigned. Go right to the Resource tab and choose the Resource Sheet view under the Team Planner icon. Begin to enter the names of the people who work with you on almost every project: My core people are Betsy Ross, George Washington, Thomas Jefferson, and Robert Redford.
Continue on Page 2 for More Advantages of Project 2010 Resource Pools - and more screenshots.
For Each Person, Enter Some Basic Information
For each of your staff, you will fill out a little index card right on your computer screen.
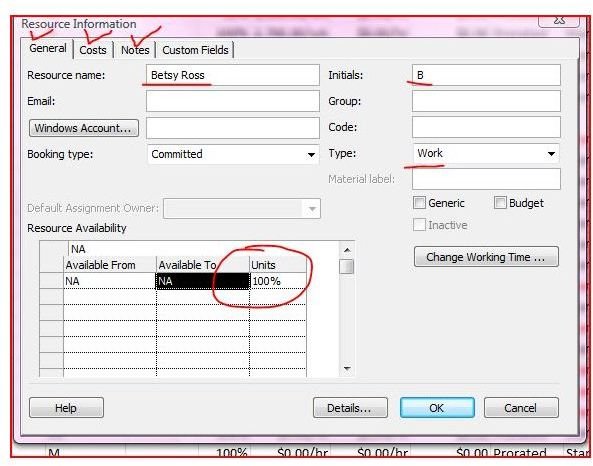
- Double-click on Betsy Ross, and you have a Resource Information box, automatically filled out with Betsy’s name and first-letter initial.
- It also sets her by default as a committed resource (rather than a proposed resource) and also as a work resource (rather than a material or cost resource).
- In the Units column below, I entered that she is available 100% of the time; this is how Project counts a full-time employee. (If she were part time, I would enter 50%, and if I scheduled her for more than twenty hours of work Project would alert me)
- I also have typed in her hourly and overtime rates. (If your project will be visible to clients or subordinate departments, avoid exposing people’s pay rates.)
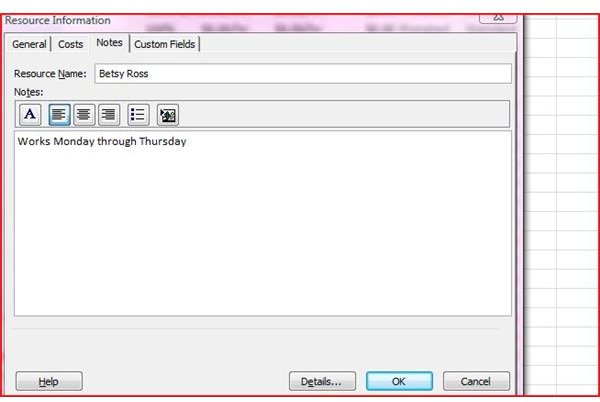
In the Notes box I have indicated that Betsy only works Monday through Thursday.
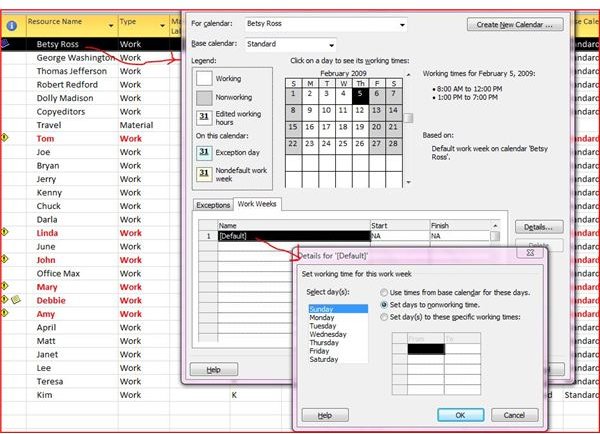
How will Project know to alert me if I schedule Betsy for a Friday task?
- To set this up, you move from the Resource tab to the Project tab.
- In the Properties group, choose Change Working Time.
- This brings up a dialogue box; you must choose the Work Weeks tab and then double-click on Default.
- Now you can see the days of the week, and you can enter for each day whether or not Betsy works. For Sunday, you can see that there are no work hours typed in, and the day Sunday is grayed out. She only has hours typed in for Monday through Thursday.
If I happen to schedule Betsy to work on a Friday, Project will let me know.
I also went back to my Resource Information box (by clicking on Betsy’s name again) and entered in the Notes section that Betsy works Monday through Thursday. I will be able to see that note whenever I roll my mouse over the notes icon beside Betsy’s name.
Now Let’s Get to the Sharing Part
Are you still asking about the advantages of using a resource pool in MIcrosoft Project? Now you’re going to share your completed list of resources.
- The screenshot below shows my new project, Employee Protocol Workbook. I typed in just a few tasks for demonstration purposes.
- Now I want to share resources from my Core Staff file.
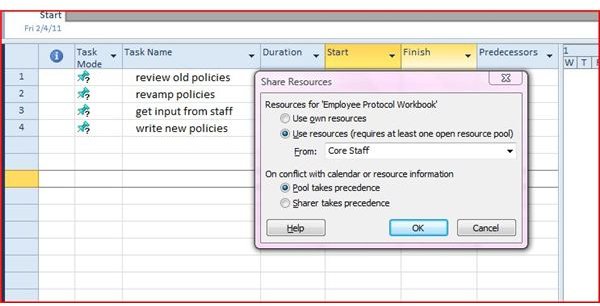
- Both the Employee Protocol Workbook and the Core Staff files must be open. On the Resource tab, choose Resource Pool, and then Share Resources.
- A dialogue box pops open asking if you want to use only the resources listed in the file or if you want to share resources from another source. I can choose to add my Core Staff by checking Use Resources (Requires At Least One Open Resource Pool); your available resource files will appear.
- You will also have to choose whether Pool Takes Precedence or Sharer Takes Precedence. It’s wise to choose Pool Takes Precedence, because it preserves any the scheduling restrictions that have been entered for your personnel.
- Once you click OK, the Employee Protocol Workbook project is populated by my list of Core Resource people.
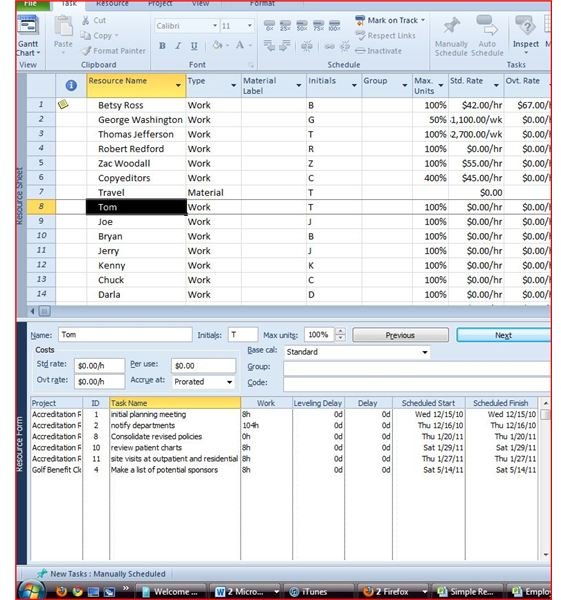
This important view shows another advantage of a Project 2010 resource pool. Now that you’re sharing resources, can you find out which people are assigned to multiple projects? You betcha! Just go to the Resource tab, and then the Properties Group, and select Details. The screen will split, and the bottom half will show an individual’s specific assignments. In our example, you can see that Tom has tasks in the Golf Benefit as well as the Accreditation Review.
How Do You Keep This Up?
It’s wise to assign an admin to keep the resource pools updated. If someone’s schedule changes or their salary increases, your files will be updated automatically.
One caveat about combining projects: When you merge projects with shared resource pools, you will in all likelihood duplicate your resources. If you try to delete one of the duplicated names, you will delete both of them. That is yet another reason why I prefer to create smaller, specialized lists. Your plan should be to put some thought into creating resource lists that apply to the types of projects under your aegis, and then when you or your managers begin a new project you will share resources selectively and easily.
Image credits: Morguefile, dtcreations
Screenshots created by the writer.